Installation
Guide of Octapus#0
in V9/10 P$2 consoles
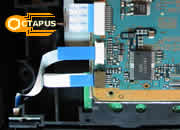
Step#1: Open your P$2 console.
First you have to open P$2 console,
voiding the Guarrrantee.
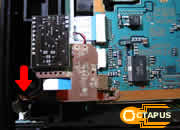
You will see 2 Ribbon Cables,
where Octapus (G3 Plug-In) will be plugged into!
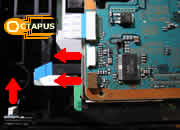
Step#2:
Disconnect the Ribbon Cables
Disconnect those 2 Ribbon Cables from P$2 mainboard and remove
the one that is connected to Eject/Reset Buttons.
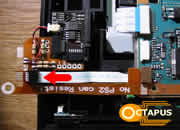
Step#3:
Connect Ribbon Cable
Plug the Ribbon Cable of to G3 Plug-In connector, keeping the right
directions shown in the photo.
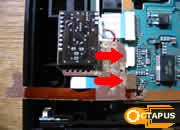
Step#4:
Plug G3 Plug-In to P$2
Plug G3 Plug-In to P$2 mainboard,
by pressing it smoothly into the connectors. Ensure that G3 Plug-In
edges are properly connected.
Step#5:
Plug G3 Plug-In to Eject
Plug G3 Plug-In edge to Eject/Reset Buttons. Installation of Octapus#0
just Finished and all you have to do
is test it by holding Eject Button for 2 sec!
Placement:
Now tend the Flex pcb and use the double sided sticker that comes
with Octapus#0, to lock the modchip. Be
carful, so none of the components come in contact with the metal
protective cover!
Where
can you find Octapus#0
Octapus is an exclusive product of GRmods - Safe Console
Hacking!
If you want to buy this product,
Please refer to our Distributors
of your country for your online orders,
and buy the full set with Swap Magic Disks for only 35 Euro!
Ask from the Installers
to install it...
... and Enjoy your Game!