 |
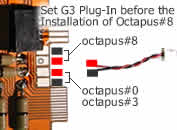
Step#1: Set G3 Plug-In
Before the installation of Octapus#8,
you must set G3 Plug-In.
Simply change the possition of the
2-wires, according the right colour.
G3 Plug-In comes ready
for Octapus#0/Octapus#3. |
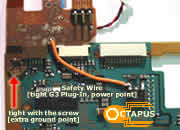 |
Step#2:
Connect Safety Wire
Now tight G3 Plug-In to P$2 mainboard
- Tight the screw to lock G3 Plug-In from the left side. (This point
is used as an extra Ground point)
- Connect with a wire G3 Plug-In with P$2 mainboard. (This point is
used to supply Power +5V to Octapus). |
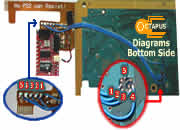 |
Step#3:
Bottom Side Diagrams
Connect with wires (kynar type),
the needed points from the Bottom Side of P$2 mainboard (1-2-3-4-5) |
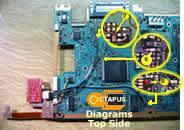 |
Step#4:
Top Side Diagrams
Connect with wires,
the needed points from the Top Side of P$2 mainboard (6-7-8) |
| cooming soon
... |
Step#5:
Plug&Solder B3 Plug-In
Now connect B3 Plug-In to Octapus#8
and you Finished! |
You
just Finished with the Installation of Octapus#8!
Now, close back your P$2 console
and Enjoy Your Game! |